Sometimes we need to run code which will be executed when Sharepoint ribbon is opened. In many cases ribbon is closed by default and you can’t access its elements in regular document.ready handler because ribbon elements are not created in the DOM yet. In this case you need to subscribe somehow on ribbon.open even and access elements there. This is how it can be done:
ExecuteOrDelayUntilScriptLoaded(function() {
 SP.Ribbon.PageManager.get_instance().add_ribbonInited(function(){
  console.log("Ribbon is opened");
 });
}, "sp.ribbon.js");
Interesting that even inside this handler you can’t access elements via jQuery selector because it doesn’t find these dynamically added elements. So e.g. the following code which tries to access New document tab in doclib will return 0:
$("#Ribbon.Documents.New").length
In order to access these dynamically added ribbon elements we need to use pure javascript call document.getElementById. Here is the full code:
ExecuteOrDelayUntilScriptLoaded(function() {
 SP.Ribbon.PageManager.get_instance().add_ribbonInited(function(){
  var el = document.getElementById("Ribbon.Documents.New");
  if (el) {
   console.log("New document tab is found");
  }
 });
}, "sp.ribbon.js");
Using this approach you will be able to access and manipulate ribbon elements via javascript.
If you have Azure notification hub with configured Apple APNS and Google FCM and try to export ARM template of this notification hub you will find that APNS and FCM configuration won’t be included to this template. In order to add APNS and FCM you need to add the following properties to ARM template:
GcmCredential for FCM
ApnsCredential for APNS
If you use Token authentication type and Production endpoint for Apple APNS template will look like this:
In order to create new notification hub using this ARM template we need to call New-AzResourceGroupDeployment cmdlet and provide params specified in parameters section of the template:
It will create new Azure notification hub with specified name in specified namespace with configured Apple APNS (Token authentication type) and Googke FCM.
If you performed inplace upgrade of Windows Server 2012 to Windows Server 2012 R2 with Sharepoint Server running you may face with the following error after upgrade will be completed: when you will try to open any Sharepoint web application the following exception will be shown:
WebHost failed to process a request. Sender Information: System.ServiceModel.ServiceHostingEnvironment+HostingManager/12547953 Exception: System.ServiceModel.ServiceActivationException: The service '/SecurityTokenServiceApplication/securitytoken.svc' cannot be activated due to an exception during compilation. The exception message is: Exception has been thrown by the target of an invocation.. ---> System.Reflection.TargetInvocationException: Exception has been thrown by the target of an invocation. ---> System.ArgumentNullException: Value cannot be null.
Parameter name: certificate at System.IdentityModel.Tokens.X509SecurityToken..ctor(X509Certificate2 certificate, String id, Boolean clone, Boolean disposable) at System.IdentityModel.Tokens.X509SecurityToken..ctor(X509Certificate2 certificate)
…
The error says that certificate for Secure token service is not specified. In order to fix this error you need to replace certificate for STS:
Open IIS manager > Server certificates > Create Self-Signed Certificate
After that export created certificate to local folder:
Next run the following PowerShell script which will update certificate for STS:
In this article I will show how to host React web app on Azure cloud platform. We will create new test React web app from scratch, will build it, then will create in Azure new Resource group and App service and after that will transfer our React web app there. Before to start ensure that you have working Azure account with valid subscription (you may create free subscription for 1 month to try things out).
First of all we need to create React app. Before to do that you need to install nodejs on your PC. By default it will also install popular npm package manager and will add its folders to PATH env variable. When it is done run the following command in your working folder:
npx create-react-app test-react-app
It will create test-react-app folder and new test React app inside it. In order to test it on local dev web server run the following command:
npm start
It will launch web server and will open default browser with React app running on http://localhost:3000:
In order to host our React app on Azure we need to build it first. In order to do that run the following command:
npm run build
It will create ready for deployment build subfolder and will copy web app files there.
Once React app is ready we need to configure Azure for hosting it. Go to Azure portal https://portal.azure.com > Resource groups > Create resource group. On the opened window give name for the new resource group and select closer location:
When new resource group will be created choose New > Web App:
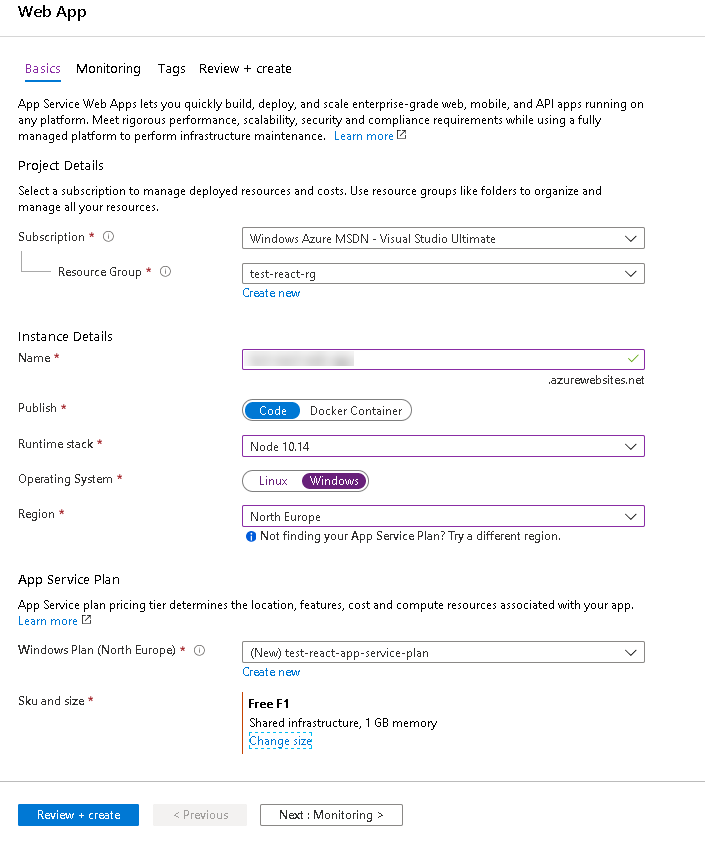
On the opened Window choose created resource group, give name for new web app, set the following parameters: Publish = Code Runtime stack = Node 10.14 Operating system = Windows also select region (usually the same region which was used for creating resource group) and App service plan name. As we create new Web app for testing purposes we will use Free app service plan: under Sku and size click Change size and change App service plan to Dev/Test > F1 free:
and click Create. After that go to created App service > Deployment center > FTP > Dashboard > App credentials and copy FTP host name, username and password:
Use your favorite FTP client in order to connect to Azure app service with credentials copied on previous step. When connection will be established copy files from local /test-react-app/build folder to FTP /site/wwwroot folder. When it will be done try to open https://{name-of-your-web-app}.azurewebsites.net in web browser (instead of {name-of-your-web-app} use name of Azure web app which was used during it’s creation). If everything was done correctly you will see your React web app hosted in Azure:
First of all we need to mention that this endpoint is available only via user delegated permissions (it doesn’t work with app-only permissions). If we will try to fetch photo of some group in Graph explorer using service account which is not member of this group we will get 404 Not found error:
After we will add the same service account to members of the same group image will be retrieved successfully:
Even if we will try to fetch photos of private group under global admin account which is not member of this group – we will still get 404 Not found. So the only way to fetch photo of the private group is to add user account to members or owners of this group. Be aware of this problem when will plan groups images fetching functionality.
As you probably know AllowToAddGuests and AllowGuestsToAccessGroups tenant settings determine whether or not external users are able to access O365 groups in your tenant. You may view or change them via PowerShell:
Note that in script we used lowercase $true while in result we got True with capital T. But if you will try to run the same script on another tenant it may save values using the same letters registry as used in script. I.e. $true will be saved as true and $True will be saved as True. And if software uses case-sensitive comparison it will cause problems. So be aware of this problem – hope it will be help someone.