Showing posts with label Localization. Show all posts

Tuesday, August 15, 2023

Problem with MissingManifestResourceException for embedded resx files in subfolders

If you worked with .Net applications you most probably know what is embedded resources:

Such resources are embedded directly to output assembly. We may check them e.g. with decompiler:


Sometime we may need to change namespace of generated resources: e.g. in above example Foo.resx file is located in Resources sub folder so by default it will generate strongly typed class in namespace TestApp.Resources:

Note also line 42 when it created ResourceManager object - it also uses TestApp.Resources namespace. Now in properties of resx file we will explicitly specify Custom tool namespace = TestApp:

After that namespace of automatically generated class will be changed from TestApp.Resources to TestApp. However ResourceManager will be still created with the same old namespace TestApp.Resources:

We may modify .Designer.cs file manually and change namespace of ResourceManager to TestApp (note that if custom tool will run again it will override manual changes in cs file and they should be done again):

But if we will try to get string from generated class Foo.Bar we will get MissingManifestResourceException:

Unhandled exception. System.Resources.MissingManifestResourceException: Could not find the resource "TestApp.Foo.resources" among the resources "TestApp.Resources.Foo.resources" embedded in the assembly "TestApp", nor among the resources in any satellite assemblies for the specified culture. Perhaps the resources were embedded with an incorrect name.

The problem is that after our changes resx file is still embedded to the assembly as TestApp.Resources.Foo.resources:

In order to fix this error we need to edit csproj file and add LogicalName element under EmbeddedResource element for our resx file with correct name:

<EmbeddedResource Update="Resources\Foo.resx">
  <Generator>ResXFileCodeGenerator</Generator>
  <LastGenOutput>Foo.Designer.cs</LastGenOutput>
  <CustomToolNamespace>TestApp</CustomToolNamespace>
  <LogicalName>TestApp.Foo.resources</LogicalName> 
</EmbeddedResource>

After that resource will be embedded to the assembly with correct name TestApp.Foo.resources:

and exception will gone

Friday, December 6, 2019

Provision language specific embedded resources with Sharepoint project type in Visual Studio

In my previous posts I showed how to provision embedded resources automatically with wsp provisioning:

Provision and automatic update of embedded resources to Resources folder in Sharepoint hive

Provision and automatic update of embedded resources to App_LocalResources folder under Sharepoint Template/Layouts or Template/ControlTemplates sub folders

In this post I will describe how to include language specific embedded resources to wsp using standard Sharepoint project type in Visual Studio.

Let’s create new empty Sharerpoint project, add Resources mapped folder, add Test.resx file there and set it as Embedded resource:

After that let’s use mentioned solution from this post in order to include Test.resx to wsp package (by default Visual Studio adds only those resx files which are set as Content). If we will publish wsp package now it will look like this:

Now let’s add language specific resource Test.ru-RU.resx:

and also add it to wsp using the same technique as for default resource file Test.resx. Now our wsp will contain both resx files which will be provisioned to {hive}/Resources folder:

But this is not enough. When we add language specific embedded resource to solution Visual Studio produces additional assembly xx-XX\{AssemblyName}.resources.dll in output folder (in our example ru-RU\SharePointProject5.resources.dll). This additional assembly should be installed to the GAC together with basic assembly – otherwise code will use only default resources from Test.resx. In order to do it we need to add this assembly to Additional assembles list in Package > Advanced > Additional assembles > Add existing assembly:

(Don’t forget to add language identifier in Location field before assembly name – i.e. ru-RU\SharePointProject5.resources.dll, but not just SharePointProject5.resources.dll. If you will have several additional languages there will be several *.resources.dll assemblies for each of them. By adding language identifier we instruct Visual Studio to put them to appropriate subfolders inside wsp package).

After that both language specific resx file and additional resources.dll assembly will be added to wsp and will be installed automatically during wsp provisioning:

Tuesday, June 25, 2019

How to get localized field titles via CSOM in Sharepoint

Some time ago I wrote article which shows how to localize web part titles via CSOM. If you are not familiar with it I recommend to read it before continue as it has useful information about Sharepoint MUI feature in general: Localize web part titles via client object model in Sharepoint. In current post I will show how to get localized field titles via CSOM in Sharepoint. This technique can be used both in on-prem and online versions.

Currently CSOM has Field.TitleResource property and it looks suitable when you want to get localized title of some field. However this is not the case. In order to get localized fields’ titles you still have to use Field.Title property but with little tuning of ClientContext – similar to those which is mentioned in the article above. More specifically you need to specify target language via “Accept-Language” HTTP header associated with ClientContext and then request field titles (of course assuming that fields have these localized titles provisioned. See e.g. Provision multilingual sites with PnP templates to see how to provision multilingual fields’ titles using PnP templates). Here is the code which shows this concept:

string siteUrl = "...";
string clientId = "...";
string clientSecret = "...";
int lcid = ...;
using (var ctx = new OfficeDevPnP.Core.AuthenticationManager().GetAppOnlyAuthenticatedContext(siteUrl, clientId, clientSecret))
{
 ctx.PendingRequest.RequestExecutor.WebRequest.Headers["Accept-Language"] = new CultureInfo(lcid).Name;
 ctx.Load(ctx.Web);
 ctx.Load(ctx.Web.Fields, f => f.Include(c => c.Id, c => c.Title));
 ctx.ExecuteQueryRetry();
 ...
}

As result when you will iterate through site columns retrieved this way they will contain titles localized for language specified with lcid parameter.

Friday, April 26, 2019

Provision multilingual sites with PnP templates

Sharepoint PnP Powershell library (which is also available on Nuget) has own provisioning engine. It is quite powerful engine which allows to provision MUI sites (although it has own problems with stability). In order to do that you need to use several basic elements:

1. Have all literals which should be localized in resx file

2. Specify supported languages inside <pnp:SupportedUILanguages>…</pnp:SupportedUILanguages> section of PnP template. After provisioning these languages will be set in Site settings > Language settings > Alternate languages. You need to have resx file for each supported language in standard resources.xx-XX.resx format

3. Resx files with translations should be specified inside <pnp:Localizations>…</pnp:Localizations> section of PnP template. Note that PnP will provision all these languages to your site regardless of what alternate languages are set in Site settings > Language settings on the moment when this template is applied to target site

4. For localized strings use {resource:ResourceKey} format inside template

Here is example of how PnP template for MUI site provisioning may look like:

<?xml version="1.0"?>
<pnp:Provisioning xmlns:pnp="http://schemas.dev.office.com/PnP/2018/01/ProvisioningSchema">
  <pnp:Localizations>
 <pnp:Localization LCID="1033" Name="English" ResourceFile="resources.en-US.resx"/>
    <pnp:Localization LCID="1031" Name="German" ResourceFile="resources.de-DE.resx"/>
  </pnp:Localizations>
  <pnp:Templates ID="Test-Container">
    <pnp:ProvisioningTemplate ID="Test" Version="1">

      <pnp:SupportedUILanguages>
        <pnp:SupportedUILanguage LCID="1033" />
        <pnp:SupportedUILanguage LCID="1031" />
      </pnp:SupportedUILanguages>

   <pnp:SiteFields xmlns:pnp="http://schemas.dev.office.com/PnP/2018/01/ProvisioningSchema">
  <Field ID="..." Name="MyField" DisplayName="{resource:MyFieldTitle}" Type="Text" Group="Custom" SourceID="..." StaticName="MyField"></Field>
   </pnp:SiteFields>
   
    </pnp:ProvisioningTemplate>
  </pnp:Templates>
</pnp:Provisioning>

It will provision file with English and German UI languages.

Thursday, February 15, 2018

Change UI language for Windows 10 single language edition

Recently I needed to change language for Windows 10 single language edition. When PC was purchased it had non-English language installed and as it was single language edition (you may check it in My PC > Properties) it was not possible to change language from OS UI on English (for me it is simpler to have it on English). However at the end it became possible to change it from command line (see below). The most tricky part is to get correct version of needed language pack. In my case OS had 10.0.15063.0 build and correct language packs links for this build are listed here: Language Pack (Build 15063 – 1703). In case link won’t work here are the links:

Windows 10 build 15063 64-bit MUI/LPs

af-ZADownload link
am-ETDownload link
ar-SADownload link
as-INDownload link
az-Latn-AZDownload link
be-BYDownload link
bg-BGDownload link
bn-BDDownload link
bn-INDownload link
bs-Latn-BADownload link
ca-ESDownload link
ca-ES-valenciaDownload link
chr-CHER-USDownload link
cs-CZDownload link
cy-GBDownload link
da-DKDownload link
de-DEDownload link
el-GRDownload link
en-GBDownload link
en-USDownload link
es-ESDownload link
es-MXDownload link
et-EEDownload link
eu-ESDownload link
fa-IRDownload link
fi-FIDownload link
fil-PHDownload link
fr-CADownload link
fr-FRDownload link
ga-IEDownload link
gd-GBDownload link
gl-ESDownload link
gu-INDownload link
ha-Latn-NGDownload link
he-ILDownload link
hi-INDownload link
hr-HRDownload link
hu-HUDownload link
hy-AMDownload link
id-IDDownload link
ig-NGDownload link
is-ISDownload link
it-ITDownload link
ja-JPDownload link
ka-GEDownload link
kk-KZDownload link
km-KHDownload link
kn-INDownload link
kok-INDownload link
ko-KRDownload link
ku-Arab-IQDownload link
ky-KGDownload link
lb-LUDownload link
lo-LADownload link
lt-LTDownload link
lv-LVDownload link
mi-NZDownload link
mk-MKDownload link
ml-INDownload link
mn-MNDownload link
mr-INDownload link
ms-MYDownload link
mt-MTDownload link
nb-NODownload link
ne-NPDownload link
nl-NLDownload link
nn-NODownload link
nso-ZADownload link
or-INDownload link
pa-Arab-PKDownload link
pa-INDownload link
pl-PLDownload link
prs-AFDownload link
pt-BRDownload link
pt-PTDownload link
quc-Latn-GTDownload link
quz-PEDownload link
ro-RODownload link
ru-RUDownload link
rw-RWDownload link
sd-ArDownload link
si-LKDownload link
sk-SKDownload link
sl-SIDownload link
sq-ALDownload link
sr-Cyrl-BADownload link
sr-Cyrl-RSDownload link
sr-Latn-RSDownload link
sv-SEDownload link
sw-KEDownload link
ta-INDownload link
te-INDownload link
tg-Cyrl-TJDownload link
th-THDownload link
ti-ETDownload link
tk-TMDownload link
tn-ZADownload link
tr-TRDownload link
tt-RUDownload link
ug-CNDownload link
uk-UADownload link
ur-PKDownload link
uz-Latn-UZDownload link
vi-VNDownload link
wo-SNDownload link
xh-ZADownload link
yo-NGDownload link
zh-CNDownload link
zh-TWDownload link
zu-ZADownload link

Windows 10 build 15063 32-bit MUI/LPs

af-ZADownload link
am-ETDownload link
ar-SADownload link
as-INDownload link
az-Latn-AZDownload link
be-BYDownload link
bg-BGDownload link
bn-BDDownload link
bn-INDownload link
bs-Latn-BADownload link
ca-ESDownload link
ca-ES-valenciaDownload link
chr-CHER-USDownload link
cs-CZDownload link
cy-GBDownload link
da-DKDownload link
de-DEDownload link
el-GRDownload link
en-GBDownload link
en-USDownload link
es-ESDownload link
es-MXDownload link
et-EEDownload link
eu-ESDownload link
fa-IRDownload link
fi-FIDownload link
fil-PHDownload link
fr-CADownload link
fr-FRDownload link
ga-IEDownload link
gd-GBDownload link
gl-ESDownload link
gu-INDownload link
ha-Latn-NGDownload link
he-ILDownload link
hi-INDownload link
hr-HRDownload link
hu-HUDownload link
hy-AMDownload link
id-IDDownload link
ig-NGDownload link
is-ISDownload link
it-ITDownload link
ja-JPDownload link
ka-GEDownload link
kk-KZDownload link
km-KHDownload link
kn-INDownload link
kok-INDownload link
ko-KRDownload link
ku-Arab-IQDownload link
ky-KGDownload link
lb-LUDownload link
lo-LADownload link
lt-LTDownload link
lv-LVDownload link
mi-NZDownload link
mk-MKDownload link
ml-INDownload link
mn-MNDownload link
mr-INDownload link
ms-MYDownload link
mt-MTDownload link
nb-NODownload link
ne-NPDownload link
nl-NLDownload link
nn-NODownload link
nso-ZADownload link
or-INDownload link
pa-Arab-PKDownload link
pa-INDownload link
pl-PLDownload link
prs-AFDownload link
pt-BRDownload link
pt-PTDownload link
quc-Latn-GTDownload link
quz-PEDownload link
ro-RODownload link
ru-RUDownload link
rw-RWDownload link
sd-ArDownload link
si-LKDownload link
sk-SKDownload link
sl-SIDownload link
sq-ALDownload link
sr-Cyrl-BADownload link
sr-Cyrl-RSDownload link
sr-Latn-RSDownload link
sv-SEDownload link
sw-KEDownload link
ta-INDownload link
te-INDownload link
tg-Cyrl-TJDownload link
th-THDownload link
ti-ETDownload link
tk-TMDownload link
tn-ZADownload link
tr-TRDownload link
tt-RUDownload link
ug-CNDownload link
uk-UADownload link
ur-PKDownload link
uz-Latn-UZDownload link
vi-VNDownload link
wo-SNDownload link
xh-ZADownload link
yo-NGDownload link
zh-CNDownload link
zh-TWDownload link
zu-ZADownload link

After you get correct language pack run the following commands in cmd as administrator:

1. Install new language pack:

dism /Online /Add-Package /PackagePath:C:\lp.cab

(assume that language pack is copied to c:\ drive and has name lp.cab)

2. List installed language packs:

dism /Online /Get-Packages

3. Copy identifier of previous language pack which came with the system and remove it:

dism /Online /Remove-Package /PackageName:{package_id}

Where instead of {package_id} you should use copied language pack identifier. After that restart Windows (it will ask you to do that) and after some time when it will be restarted OS UI will use new language.

Wednesday, November 15, 2017

Fix problem with “The formula refers to a column that does not exist” error in calculated columns for Sharepoint lists which use owssvr.dll

Sharepoint contains many hidden features which are really useful. One of them is possibility to generate iCal files (.ics) from calendar event. In order to do it you need to add calculated field to the calendar with the following formula:

   1: =”http://<SITE_URL>/_vti_bin/owssvr.dll?CS=109&Cmd=Display&List=<LIST_GUID>
   2: &CacheControl=1&ID=”&ID&”&Using=event.ics”

where instead of <SITE_URL> you should use url of web site where calendar list is located and instead of <LIST_GUID> – guid of the calendar list. You may get list guid if will go to List settings page – guid will be in browser address bar in List query string parameter. Also note that list guid should be added without curly braces because otherwise link won’t be clickable in list item view form.

This formula will work properly on English sites (and for several other languages – see below) but if you will try to use it on some other language site (e.g. on Finnish) you may get the following error:

The formula refers to a column that does not exist. Check the formula for spelling mistakes or change the non-existing column to an existing column

(error message will be translated on the local language as well). The problem is related with internal representation of ID field and with fact that in formulas fields’ display names should be used instead of internal names. If we will check it e.g. using Sharepoint Manager tool there will be property called SchemaXmlWithResourceTokens which contains xml definition of ID field. It will look similar to this:

   1: <Field ID="..."
   2:        ColName="tp_ID"
   3:        RowOrdinal="0"
   4:        ReadOnly="TRUE"
   5:        Type="Counter"
   6:        Name="ID"
   7:        PrimaryKey="TRUE"
   8:        DisplayName="$Resources:core,ID;"
   9:        SourceID="http://schemas.microsoft.com/sharepoint/v3"
  10:        StaticName="ID"
  11:        FromBaseType="TRUE" />

Pay attention of DisplayName attribute of the field: for ID (which is internal field which exists for all list items) it is retrieved from core.resx file, i.e. it is localized as well as other fields. So e.g. for Finnish language (DisplayName=Tunnus) formula will look like this:

   1: =”http://<SITE_URL>/_vti_bin/owssvr.dll?CS=109&Cmd=Display&List=<LIST_GUID>
   2: &CacheControl=1&ID=”&Tunnus&”&Using=event.ics”

I checked core.resx for all languages available for Sharepoint 2013 and found the following languages which will have the same problem: Catalan (ca-ES), Bulgarian (bg-BG), Greek (el-GR), Basque (eu-ES), Hebrew (he-IL), Hungarian (hu-HU), Dutch (nl-nl) uses “Id” instead of “ID”, Polish (pl-PL), Russian (ru-RU), Turkish (tr-TR), Ukranian (uk-UA), Chinese Taiwan (zh-TW). Other languages use “ID” display name for ID field.

Tuesday, March 7, 2017

Provision and automatic update of embedded resources to App_LocalResources folder under Sharepoint Template/Layouts or Template/ControlTemplates sub folders

In one of my previous posts I showed how to include embedded provision resources (located in {SharepointRoot}\Resources) to wsp package so they will be provisioned and updated automatically (see Provision and automatic update of embedded resources to Resources folder in Sharepoint hive). However on practice we also often add UI resources specific to concrete application layouts page (page located under Template/Layouts subfolder) or user control (under Template/ControlTemplates). E.g. if we have a page /Template/Layouts/Test/foo.aspx then UI resource will be located in /Template/Layouts/Test/App_LocalResources/foo.aspx.resx. Note that it has the same name as parent page plus .resx extension. In this case we can use the following declarative syntax in foo.aspx layout:

   1: <asp:Literal Text="<%$Resources:Test%>" runat="server" />

and ASP.Net will automatically get resource string with key Test from foo.aspx.resx file.

This approach simplifies localization of UI components in Sharepoint. The problem is that if we add our resource file as Content to Visual Studio project it will be added to result manifest.xml of wsp package during publishing. However if we will change it’s type to Embedded resource it won’t be added (which is needed if we want to use resource strings also from C# code), i.e. in this case we will need to update it manually (i.e. behavior is the same as for root resources described in the article mentioned above).

In order to fix this issue, i.e. in order to force Visual Studio to add embedded resx file from App_LocalResources folder to wsp package we will use the same approach described in Provision and automatic update of embedded resources to Resources folder in Sharepoint hive. But syntax of SharePointProjectItem.spdata file will be different. In case of local UI resources it will look like this:

   1: <?xml version="1.0" encoding="utf-8"?>
   2: <ProjectItem Type="Microsoft.VisualStudio.SharePoint.GenericElement"
   3: SupportedTrustLevels="All"
   4: SupportedDeploymentScopes="Web, Site, WebApplication, Farm, Package"
   5: xmlns="http://schemas.microsoft.com/VisualStudio/2010/SharePointTools/SharePointProjectItemModel">
   6:   <Files>
   7:     <ProjectItemFile Source="..\..\..\Layouts\Test\App_LocalResources\foo.aspx.resx"
   8:         Target="Layouts\Test\App_LocalResources" Type="TemplateFile" />
   9:   </Files>
  10: </ProjectItem>

After that if you will publish wsp package reference on embedded resource will be added there:

   1: <TemplateFiles>
   2:     ...
   3:     <TemplateFile Location="Layouts\Test\App_LocalResources\foo.aspx.resx" />
   4: </TemplateFiles>

I.e. we will have all embedded resources provisioned automatically.

Friday, January 6, 2017

Provision and automatic update of embedded resources to Resources folder in Sharepoint hive

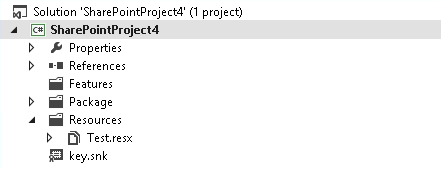
Automatic provision of embedded resources may be quite annoying unless you know how to do it automatically. Surprisingly I didn’t find articles about this issue so decided to write this post. As you probably know in order to provision own resources (resx) files to Sharepoint Resources folder (e.g. 15/Resources in Sharepoint 2013) we add Resources Sharepoint mapped folder in Visual studio and add resx files there:
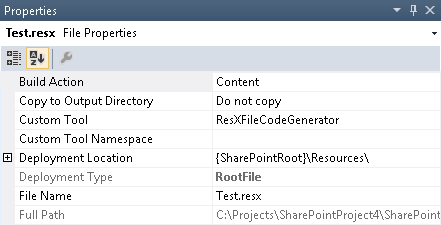
By default when we add resx file it is added with Build Action = Content:
If we will create wsp package with such resource file we will see that it will include resx file inside the package:

and manifest.xml will have reference on it:

   1: <?xml version="1.0" encoding="utf-8"?>
   2: <Solution xmlns="http://schemas.microsoft.com/sharepoint/"
   3:     SolutionId="c9c995d9-6cf3-422e-81fc-ffb0f7648610"
   4:     SharePointProductVersion="15.0">
   5:   <Assemblies>
   6:     <Assembly Location="SharePointProject4.dll" DeploymentTarget="GlobalAssemblyCache" />
   7:   </Assemblies>
   8:   <RootFiles>
   9:     <RootFile Location="Resources\Test.resx" />
  10:   </RootFiles>
  11: </Solution>

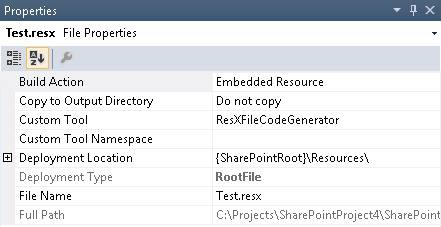
However we may want to reuse it for using localized strings also from C# code. In order to do that we need to open resx file in Visual Studio designer and set Access Modifier to Internal or Public. After that VS generates .designer.cs file with strongly-typed C# class which we then can use from the code. After that we also need to change Build Action to Embedded Resource:
But if then we will try to create wsp package we will see that resx file is not included to it anymore:

manifest.xml won’t have reference to resource file as well:

   1: <?xml version="1.0" encoding="utf-8"?>
   2: <Solution xmlns="http://schemas.microsoft.com/sharepoint/"
   3:     SolutionId="c9c995d9-6cf3-422e-81fc-ffb0f7648610"
   4:     SharePointProductVersion="15.0">
   5:   <Assemblies>
   6:     <Assembly Location="SharePointProject4.dll" DeploymentTarget="GlobalAssemblyCache" />
   7:   </Assemblies>
   8: </Solution>

And it means that our resx files won’t be automatically updated anymore when we will update wsp solution via Update-SPSolution cmdlet. Does it mean that with ability to use embedded resources from C# we lost automatic updates of resx files? Fortunately no, there is workaround which will allow to have both possibilities.

First thing which we need to do is to add new Empty element to the project:
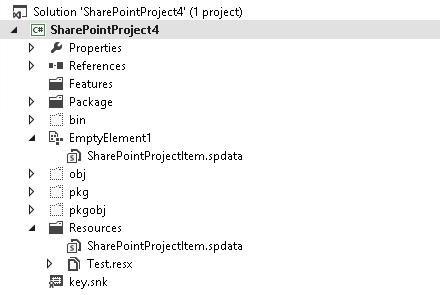
If you didn’t have features in your project yet VS will create new feature automatically and will add new element there. We don’t need this feature so delete it. If you had already features in the project VS will add new element to one of them – this is also not needed so revert changes in features after new element has been added. Also we won’t need elements.xml file under new element – remove it as well.

Then edit SharePointProjectItem.spdata file under added element (you can see it in Solution explorer when will click Show all files there) and add reference to resx file like this:

   1: <?xml version="1.0" encoding="utf-8"?>
   2: <ProjectItem Type="Microsoft.VisualStudio.SharePoint.GenericElement"
   3:     SupportedTrustLevels="All"
   4:     SupportedDeploymentScopes="Web, Site, WebApplication, Farm, Package"
   5:     xmlns="http://schemas.microsoft.com/VisualStudio/2010/SharePointTools/SharePointProjectItemModel">
   6:   <Files>
   7:     <ProjectItemFile Source="..\Resources\Test.resx" Target="Resources" Type="RootFile" />
   8:   </Files>
   9: </ProjectItem>

Source attribute should contain correct relative path to resx from from SharePointProjectItem.spdata file. And add element to the package in VS designer:
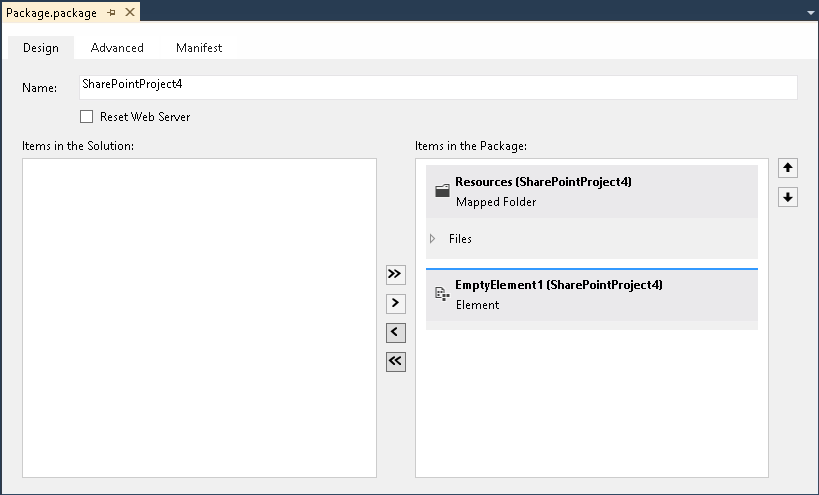
After that if you will publish wsp package you will see that it again contains resx file and reference inside manifest.xml:

   1: <?xml version="1.0" encoding="utf-8"?>
   2: <Solution xmlns="http://schemas.microsoft.com/sharepoint/"
   3:     SolutionId="c9c995d9-6cf3-422e-81fc-ffb0f7648610"
   4:     SharePointProductVersion="15.0">
   5:   <Assemblies>
   6:     <Assembly Location="SharePointProject4.dll" DeploymentTarget="GlobalAssemblyCache" />
   7:   </Assemblies>
   8:   <RootFiles>
   9:     <RootFile Location="Resources\Test.resx" />
  10:   </RootFiles>
  11: </Solution>

Now if you will update wsp via Update-SPSolution your embedded resource files will be updated automatically. The only thing which you need to remember is that if you add new embedded resource to the project you will need to add reference on it to the SharePointProjectItem.spdata. But from my point of view this is not big price for possibility to use resources from the code and have automatic updates for them.

Update 2017-03-07: see also how to provision embedded local UI resources from App_LocalResources folder in this post: Provision and automatic update of embedded resources to App_LocalResources folder under Sharepoint Template/Layouts or Template/ControlTemplates sub folders