Showing posts with label MS Office. Show all posts

Wednesday, September 23, 2015

Provisioning ready for use OneNote notebook to Sharepoint site–part 2

In the previous part I showed how to provision ready for use OneNote notebook to Sharepoint site. Described method works but has one drawback: if you have many sites and need to create notebook in all of them, users who will work with several sites will always see the same notebook name and won’t know from which sites they are because all of them will have the same name “New Section 1” (remember that we provisioned 2 files in Notebook docset: “Open Notebook.onetoc2” and “New Section 1.one”). In this post we will show this issue.

User experience will be better if we will use different names for notebooks. E.g. we may use parent sites’ titles for notebooks. In this case users will be able to open notebooks from different sites in OneNote desktop application and will know from which site each notebook is:

image

image

It is quite simple to do. We need to rename “New Section 1.one” to {web title}.one in web provisioned handler or in feature receiver (depending how you implemented it) right after setting ProgId for the Notebook folder (changing of ProgId was described in previous part):

   1: var list = web.GetList(SPUrlUtility.CombineUrl(web.ServerRelativeUrl, "OneNote"));
   2: var folder = list.Folders.Cast<SPListItem>().FirstOrDefault(f =>
   3:     f.Url.EndsWith("Notebook"));
   4: folder[SPBuiltInFieldId.Title] = "Notebook";
   5: folder.ProgId = "OneNote.Notebook";
   6: folder.Update();
   7:  
   8: foreach (SPFile file in folder.Folder.Files)
   9: {
  10:     if (string.Compare(file.Name, "New Section 1.one", true) == 0)
  11:     {
  12:         file.MoveTo(string.Format("OneNote/{Notebook/{0}.one", web.Title));
  13:     }
  14: }

After that notebook will have the same title as parent web and users will be able to distinguish notebooks in OneNote as shown on the picture above.

Friday, September 5, 2014

Provisioning ready for use OneNote notebook to Sharepoint site

OneNote notebooks can be manually saved to the Sharepoint document library so users may share the notebook in the work. It is useful feature e.g. for workspaces which are often used in Sharepoint. But as it often happen those actions which can be done manually are not always so simple when we will need to automate the process, e.g. when we need to provision ready for use OneNote notebook during creation of the site. In this article I will show how it can be done.

First of all we need to make some preparation work: we need to prepare notebook template which will be provisioned to our doclib. In order to do this create new document library manually and select “Microsoft OneNote 2010 Notebook” in Document template list:

image

So under New document you should see OneNote icon:

image

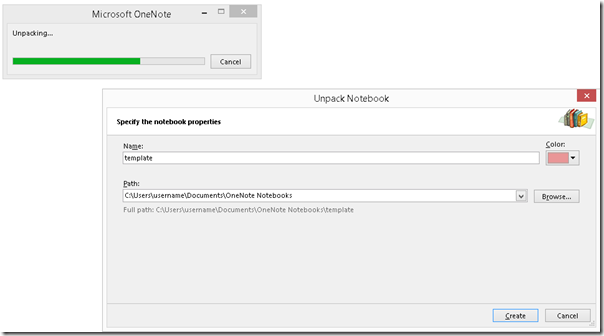
Create new document here. It will open OneNote client where you will need to specify name of the new notebook when it will unpack the new notebook:
image

During unpacking it will create local copy of the notebook in your file system under “C:\Users\username\Documents\OneNote Notebooks” location. Now we should save this notebook to the Sharepoint document library: File > Share > Add a place > Office 365 SharePoint and put url of your site in the opened dialog. By default it only shows “Office 365 SharePoint”, but if you will put url manually, it should also allow to save it in on-premise site (see Getting OneNote 2013 to Work With On-Premise SharePoint):

image

After that if you will go to the document library you will see the saved notebook there:

image

Internally OneNote notebooks are similar to document sets which in turn close to the folders. Moreover if you will check add Content type column to the doclib view, it will show that notebook has Folder content type as it shown on the picture above. Now open document library in Explorer view: it will show the notebook as regular folder. Copy this folder to the local file system. It will contain 2 files:

  1. New Section 1.one
  2. Open Notebook.onetoc2

This folder with files will be used as template when during provisioning. However here we will face with the problem: if we will just copy this folder back to the document library but with different name, we will see that it will become regular Sharepoint folder:

image

On this picture we see that original notebook saved from OneNote client has correct icon, while the same file copied from local file system looks and behaves like regular folder. I.e. when user will click on such copied notebook, then instead of opening OneNote app (web app or desktop client) it will just go inside the folder where 2 mentioned files will be shown. This is definitely not what we want.

Let’s check the difference between these 2 folders e.g. in Sharepoint client browser (similar to the Sharepoint manager, but works also for O365):

image

As you can see real notebook has HTML File type set to “OneNote.Notebook”. The same difference also can be found for the ProgId field:

image

Another found difference is that real notebook has Title specified, while copied – not. Now the fix is quite obvious: we need to set ProgId for the copied Notebook (and Title for safety) in order to make it “real” notebook. Here is the code which makes the trick:

   1: var list = web.GetList(SPUrlUtility.CombineUrl(web.ServerRelativeUrl,
   2:     "OneNote"));
   3: var folder = list.Folders.Cast<SPListItem>().FirstOrDefault(f =>
   4:     f.Url.EndsWith("Notebook"));
   5: folder[SPBuiltInFieldId.Title] = "Notebook";
   6: folder.ProgId = "OneNote.Notebook";
   7: folder.Update();

The same thing can be also done via client object model:

   1: var ctx = new ClientContext("http://example.com");
   2: ctx.AuthenticationMode = ClientAuthenticationMode.Default;
   3: var pwd = new SecureString();
   4: foreach (var c in "password")
   5: {
   6:     pwd.AppendChar(c);
   7: }
   8: ctx.Credentials = new SharePointOnlineCredentials("username", pwd);
   9: var site = ctx.Site;
  10: ctx.Load(site);
  11:  
  12: var web = site.OpenWeb("foo");
  13: ctx.Load(web);
  14:  
  15: var lists = web.Lists;
  16: ctx.Load(lists);
  17:  
  18: var list = lists.GetByTitle("OneNote");
  19: ctx.Load(list, l => l.RootFolder);
  20:  
  21: var folders = list.RootFolder.Folders;
  22: ctx.Load(folders);
  23:  
  24: var folder = folders.GetByUrl("OneNote/NotebookCopied");
  25: ctx.Load(folder, f => f.ListItemAllFields);
  26: ctx.ExecuteQuery();
  27:  
  28: folder.ListItemAllFields["Title"] = "NotebookCopied";
  29: folder.ListItemAllFields["HTML_x0020_File_x0020_Type"] =
  30:     "OneNote.Notebook";
  31: folder.ListItemAllFields.Update();
  32: ctx.ExecuteQuery();

After fix copied notebook will look and behave like real OneNote notebook:

image

This code can be added to the feature receiver or to the web provisioned handler. Also you will need to provision 2 OneNote files via module to your document library before it will run:

   1: <?xml version="1.0" encoding="utf-8"?>
   2: <Elements xmlns="http://schemas.microsoft.com/sharepoint/">
   3:   <Module Name="MONotebook" Url="OneNote">
   4:     <File Path="MONotebook\New Section 1.one"
   5: Url="Notebook/New Section 1.one" />
   6:     <File Path="MONotebook\Open Notebook.onetoc2"
   7: Url="Notebook/Open Notebook.onetoc2" />
   8:   </Module>
   9: </Elements>

Provided approach works both in farms and sandbox solution, so you may use it also in Sharepoint online.

Update 2015-09-22: second part of this article is available here.

Friday, December 21, 2012

Remove Sharepoint metadata from MS Office documents

In Sharepoint you may store files in the document libraries. Among with files themselves, it is possible to add additional metadata to each file. It is on of the ways to categorize content. In new Sharepoint 2013 platform it is even more important with their attraction to search-based solutions. Metadata values are stored differently for different files:

  • for Office documents metadata is stored in the file itself. It includes new open xml format (docx, xlsx, etc), and old formats (doc, xls, etc);
  • for other documents metadata is stored in the content database (there are also several mentions in the network that you may change this behavior by installing some extensions to the Sharepoint, but I didn’t find such extensions, if you know them, please share in comments).

So for example when you copy Word document (docx) from one document library to another (document libraries may be located in different web applications on different farms), metadata will be preserved. But if you will copy e.g. pdf document, all metadata will be lost. In this article I will show how to clear office files from the metadata. It can be useful when you reorganized content structure and want to start with clear version, without inheriting the garbage of old metadata (which even can be deleted in new version if we talk about managed metadata).

First of all we need to understand how metadata is stored in the office documents. I recommend the following article: Document Information Panel and Document Properties in SharePoint Server 2010. It says that metadata is stored inside “customXml section of the Open XML formats”:

image

However theory doesn’t provide all necessary information. In order to be able to remove metadata we need to understand it deeper. So for testing I created docx file with some test content, uploaded it to the document library with custom content type with several managed metadata fields and specified some values in these fields. After that I opened the doclib in the explorer view and copied document back to the file system. After that I changed extension to zip and unpacked the content of the file. In the files inside the package I found that managed metadata is stored in 2 places actually:

  • item3.xml file inside customXml subfolder;
  • custom.xml file inside docProps subfolder.

Metadata is stored differently inside these files. In the item3.xml it is stored like this:

   1: <?xml version="1.0" encoding="utf-8"?>
   2: <p:properties xmlns:p="http://schemas.microsoft.com/office/2006/metadata/properties"
   3: xmlns:xsi="http://www.w3.org/2001/XMLSchema-instance"
   4: xmlns:pc="http://schemas.microsoft.com/office/infopath/2007/PartnerControls">
   5:   <documentManagement>
   6:     <AuthorLogin xmlns="..." xsi:nil="true"/>
   7:     <DocLanguage_Hidden xmlns="...">
   8:       <Terms xmlns="...">
   9:         <TermInfo xmlns="...">
  10:           <TermName xmlns="...">English</TermName>
  11:           <TermId xmlns="...">42f6e37f-06b6-4881-946d-fc945753adfa</TermId>
  12:         </TermInfo>
  13:       </Terms>
  14:     </DocLanguage_Hidden>
  15:     ...
  16:   </documentManagement>
  17: </p:properties>

For clarity I removed “http://schemas.microsoft.com/office/infopath/2007/PartnerControls” namespace from the some tags. This example shows that Language field contains English value. Also termId is stored within the value.

In custom.xml data is stored by the following way:

   1: <?xml version="1.0" encoding="UTF-8" standalone="yes"?>
   2: <Properties xmlns="http://schemas.openxmlformats.org/officeDocument/2006/custom-properties"
   3: xmlns:vt="http://schemas.openxmlformats.org/officeDocument/2006/docPropsVTypes">
   4:   <property fmtid="{D5CDD505-2E9C-101B-9397-08002B2CF9AE}" pid="2" name="ContentTypeId">
   5:     <vt:lpwstr>...</vt:lpwstr>
   6:   </property>
   7:   <property fmtid="{D5CDD505-2E9C-101B-9397-08002B2CF9AE}" pid="9" name="DocLanguage">
   8:     <vt:lpwstr>7;#English|42f6e37f-06b6-4881-946d-fc945753adfa</vt:lpwstr>
   9:   </property>
  10:   ...
  11: </Properties>

Here we also see value and term id, but in different format.

This investigation tells us that we need to remove the metadata from 2 places somehow. But how to do that, i.e. how to remove metadata from the office file programmatically?

First of all we need to download the Open XML SDK. We need to reference the following assembly from this SDK: DocumentFormat.OpenXml.dll. Also we will need to reference standard WindowsBase.dll. The code which removes the metadata is below:

   1: using (var document = WordprocessingDocument.Open("test.docx", true))
   2: {
   3:     // delete from custom properties first
   4:     if (document.CustomFilePropertiesPart != null &&
   5: document.CustomFilePropertiesPart.Properties != null)
   6:     {
   7:         document.CustomFilePropertiesPart.Properties.RemoveAllChildren();
   8:         document.CustomFilePropertiesPart.Properties.Save();
   9:     }
  10:  
  11:     // then from custom xml part "properties"
  12:     if (document.MainDocumentPart != null &&
  13: document.MainDocumentPart.CustomXmlParts != null)
  14:     {
  15:         Func<CustomXmlPart, bool> predicate =
  16:             p =>
  17:                 {
  18:                     using (var reader = new StreamReader(p.GetStream()))
  19:                     {
  20:                         var root = XElement.Load(reader);
  21:                         return (root.Name.LocalName == "properties");
  22:                     }
  23:                 };
  24:  
  25:         var propertiesPart = document.MainDocumentPart.CustomXmlParts
  26:             .FirstOrDefault(p => predicate(p));
  27:         if (propertiesPart != null)
  28:         {
  29:             document.MainDocumentPart.DeletePart(propertiesPart);
  30:         }
  31:     }
  32: }

Here we remove the metadata from the custom.xml first (lines 4-9) and then from custom xml part of the document item3.xml (lines 12-31). Removing from custom xml part is a little bit more tricky because you need to read xml content from the stream in order to find the correct part (single office file may contain several such parts).

Run this program with the file which contains metadata and then copy the file into another document library, all metadata will be empty. Hope that it will help you in your work.