Wednesday, November 23, 2022

Slow VMWare Player after upgrade to Windows 11

Recently my Windows 10 PC was upgraded to Windows 11. One problem which I noticed after that was slowness of VMWare Player on Windows 11 comparing with Windows 10. There are several posts about similar problem which may be found in internet - almost all of them suggest few things: turn off Hyper-V Windows feature, run command "bcdedit /set hypervisorlaunchtype off", disable memory integrity in Windows Security > Device Security > Core Isolation details. I tried them but it didn't help.

I also tried to update to the latest VMWare Player 17 which according to it's description fully supports Windows 11 as host operating system. That didn't help either.

Also some posts suggested obvious things like increasing memory and CPU. I tried to increase memory a bit (virtual machine already had 16Gb RAM and 8 processor cores which should be enough. Remember that on Windows 10 it worked very fast) without success.

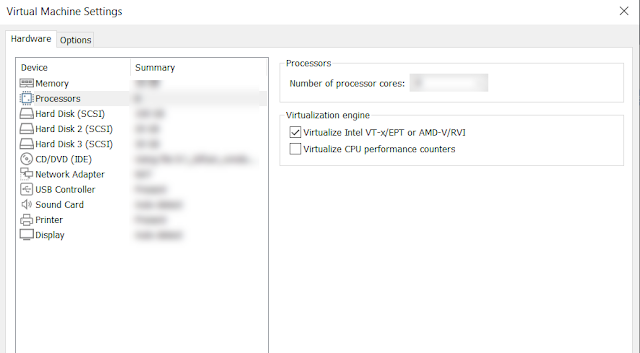
Then I tried opposite thing: reduce number of processor cores from 8 to 4:

and surprisingly it helped! VMWare Player became fast again. This solution may look non logical but may help someone so I decided to share it.

Wednesday, November 16, 2022

Camlex and Camlex.Client 5.4.1 released

I'm glad to announce that today new version 5.4.1 of Camlex/Camlex.Client libraries were released. This is minor release which contains fix for reverse engineering of binary operations (Geq, Gt, Leq, Lt) for text values. Reverse engineering is used in free online service http://camlex-online.org where Sharepoint developers which are new to Camlex can automatically convert classic CAML query to C# syntax for Camlex. Thus it will simplify migration of existing code to Camlex.

Credits for this release go to Ivan Russo which contributed to Camlex (thanks a lot Ivan). If you are Sharepoint developer and have idea how to improve Camlex feel free to create PR :).

Friday, September 23, 2022

Generate C# client for API with Swagger (OpenAPI) support

If you develop web API it worth to consider to add support for Swagger specification (or OpenAPI specification) to it. As documentation says:

OAS defines an API’s contract, allowing all the API’s stakeholders, be it your development team, or your end consumers, to understand what the API does and interact with its various resources, without having to integrate it into their own application.

One of the practical advantage is possibility to easily create documentation for web API which supports Swagger. Another big advantage is possibility to generate SDK (client) for web API using preferred language. There are Swagger Codegen tools for that. One of them is online web service https://generator3.swagger.io/api/generate which can be used for generating SDK online.

Let's see how to use that and generate C# client for sample web API https://petstore.swagger.io/v2/swagger.json with Swagger support. We need to send HTTP POST request tohttps://generator3.swagger.io/api/generate with the following body:

{
  "specURL" : "https://petstore.swagger.io/v2/swagger.json",
  "lang" : "csharp",
  "type" : "CLIENT",
  "codegenVersion" : "V3"
}

and add header "Content-Type": "application/json". In "lang" parameter we specified which language should be used for generating SDK. After that web service will generate C# client for us and will return generated .cs classes in zip archive. If you use Postman then instead of Send button need to use Send and Download:


Zip archive will contain Visual Studio solution with generated SDK for web API:

As you can see it contains generated model classes and API for working with them so no need to code it manually. It may save a lot of time when you work with external web API.

Update 2023-03-29: see also another blog post Generate strongly-typed C# client for ASP.Net Core Web API with OpenAPI (swagger) support running on localhost which describes how to generate C# client for web api running on localhost.

Wednesday, September 7, 2022

Fix problem with PnP.PowerShell log file locked for writing by Set-PnPTraceLog

If you use PnP.PowerShell then most probably you are familiar with Set-PnPTraceLog cmdlet which allows to enable logging from PnP cmdlets. This is useful feature which simplifies troubleshooting especially if error got reproduced only on customer's environment. However there is one unpleasant side effect: Set-PnPTraceLog locks log file for writing. I.e. it is not possible to reuse the same file for other purposes and write there from anoter sources. Let's see why it happens.

Internally Set-PnPTraceLog uses TextWriterTraceListener (thanks Gautam Sheth for sharing it):

If we will decompile code of TextWriterTraceListener (which is quite easy in VS2022) we will find that it opens FileStream with FileShare.Read option:


And that's exactly the reason why it is not possible to write anything else to this log file until PowerShell session where Set-PnPTraceLog was called will be closed.

In order to solve this problem we need to use our own FileStream and inject it to PnP logging system. It can be done by the following PowerShell code:

# enable logging
Set-PnPTraceLog -On -LogFile $logFilePath -Level Debug
# close default file stream
[System.Diagnostics.Trace]::Listeners[1].Writer.Close()
# open new file stream with FileShare.ReadWrite
$fileStream = New-Object System.IO.FileStream($logFilePath, [System.IO.FileMode]::Append, [System.IO.FileAccess]::Write, [System.IO.FileShare]::ReadWrite, 4096)
# inject new file stream to PnP
[System.Diagnostics.Trace]::Listeners[1].Writer = New-Object System.IO.StreamWriter($fileStream, [System.Text.Encoding]::UTF8, 4096, $false)

Here we first enable PnP logging Set-PnPTraceLog. Every process by default already has trace listener called DefaultTraceListener which is accessible from Trace.Listeners[0]. In order to access listener added by Set-PnPTraceLog we need access Trace.Listeners[1]. So after that we open new FileStream with FileShare.ReadWrite and then use it for StreamWriter which we inject to PnP. As result PnP will use our own FileStream and it will be possible to write to the same log from another sources.

Friday, August 19, 2022

Fix for "The system cannot open the device or file specified" error in Windows Installer

Some time ago I wrote instructions how to increase space on C drive by moving Windows system folders to D drive and creating junction link (see How to free space on OS Windows drive by moving SoftwareDistribution folder to another disk via junction folder). It works but there may be side effects if you will also move C:/Windows/Installer folder: one of known issue is that after that some (not all) installations from msi files won't work. E.g. I faced with the following error when tried to installed NodeJS:

The system cannot open the device or file specified


One solution which you may try is the following:

  1. Remove junction link for C:\Windows\Installer folder (but keep actual folder which contains files on D drive!) and create normal folder C:\Windows\Installer (it will be empty)
  2. Run installer - it should work without errors and should put sub folders of new installation into C:\Windows\Installer
  3. After installation move sub folders from C:\Windows\Installer to Installer on D drive
  4. Delete C:\Windows\Installer folder
  5. Create junction link again

If it won't help try to repeat these steps also for SoftwareDistribution folder (if junction was created for C:/Windows/SoftwareDistribution as well).

However there is simpler way to avoid mentioned error: run installer in silent mode from PowerShell. I found useful script which does it here. Will post it here in case link won't be available:

$fileName = "..."

$DataStamp = get-date -Format yyyyMMddTHHmmss
$logFile = '{0}-{1}.log' -f $fileName,$DataStamp
$MSIArguments = @(
    "/i"
    ('"{0}"' -f $fileName)
    "/qn"
    "/norestart"
    "/L*v"
    $logFile
)
Start-Process "msiexec.exe" -ArgumentList $MSIArguments -Wait -NoNewWindow 

Before to run it put full path to your msi file into $fileName variable. Script will run installer in silent mode and will write all steps into log file so you may check results. After that program should appear in the list of installed apps in Control panel > Programs and features.

Wednesday, August 17, 2022

Get Sharepoint data in browser console via Rest API without additional tools

Sometimes during troubleshooting you need to quickly get some data from Sharepoint, e.g. id of current site collection. There are many ways how to do that with additional tools e.g. from PowerShell and PnP, SPEditor Chrome extension and it's pnpjs console, etc. But it requires installation of these tools and their knowledge (of course if you work with Sharepoint it will be better if you will know these tools :) ).

One way how you may get this data without extra tools is to use SP Rest API directly from browser console. E.g. for getting site collection details we may fetch /_api/site endpoint and output JSON response to console:

fetch("https://{mytenant}.sharepoint.com/sites/test/_api/site", {headers: {"accept": "application/json; odata=verbose"}}).then(response => response.json().then(txt => console.log(JSON.stringify(txt))))

(here instead of {mytenant} you should use your tenant name. Note however that this approach will also work in on-prem)

It will output a lot of information about current site collection to the console:

{
    "d": {
        "__metadata": {
            "id": "https://{mytenant}.sharepoint.com/sites/test/_api/site",
            "uri": "https://{mytenant}.sharepoint.com/sites/test/_api/site",
            "type": "SP.Site"
        },
        "Audit": {
            "__deferred": {
                "uri": "https://{mytenant}.sharepoint.com/sites/test/_api/site/Audit"
            }
        },
        "CustomScriptSafeDomains": {
            "__deferred": {
                "uri": "https://{mytenant}.sharepoint.com/sites/test/_api/site/CustomScriptSafeDomains"
            }
        },
        "EventReceivers": {
            "__deferred": {
                "uri": "https://{mytenant}.sharepoint.com/sites/test/_api/site/EventReceivers"
            }
        },
        "Features": {
            "__deferred": {
                "uri": "https://{mytenant}.sharepoint.com/sites/test/_api/site/Features"
            }
        },
        "HubSiteSynchronizableVisitorGroup": {
            "__deferred": {
                "uri": "https://{mytenant}.sharepoint.com/sites/test/_api/site/HubSiteSynchronizableVisitorGroup"
            }
        },
        "Owner": {
            "__deferred": {
                "uri": "https://{mytenant}.sharepoint.com/sites/test/_api/site/Owner"
            }
        },
        "RecycleBin": {
            "__deferred": {
                "uri": "https://{mytenant}.sharepoint.com/sites/test/_api/site/RecycleBin"
            }
        },
        "RootWeb": {
            "__deferred": {
                "uri": "https://{mytenant}.sharepoint.com/sites/test/_api/site/RootWeb"
            }
        },
        "SecondaryContact": {
            "__deferred": {
                "uri": "https://{mytenant}.sharepoint.com/sites/test/_api/site/SecondaryContact"
            }
        },
        "UserCustomActions": {
            "__deferred": {
                "uri": "https://{mytenant}.sharepoint.com/sites/test/_api/site/UserCustomActions"
            }
        },
        "AllowCreateDeclarativeWorkflow": false,
        "AllowDesigner": true,
        "AllowMasterPageEditing": false,
        "AllowRevertFromTemplate": false,
        "AllowSaveDeclarativeWorkflowAsTemplate": false,
        "AllowSavePublishDeclarativeWorkflow": false,
        "AllowSelfServiceUpgrade": true,
        "AllowSelfServiceUpgradeEvaluation": true,
        "AuditLogTrimmingRetention": 90,
        "ChannelGroupId": "00000000-0000-0000-0000-000000000000",
        "Classification": "",
        "CompatibilityLevel": 15,
        "CurrentChangeToken": {
            "__metadata": {
                "type": "SP.ChangeToken"
            },
            "StringValue": "..."
        },
        "DisableAppViews": false,
        "DisableCompanyWideSharingLinks": false,
        "DisableFlows": false,
        "ExternalSharingTipsEnabled": false,
        "GeoLocation": "EUR",
        "GroupId": "00000000-0000-0000-0000-000000000000",
        "HubSiteId": "00000000-0000-0000-0000-000000000000",
        "Id": "32d406dc-dc97-46dd-b01c-e6346419ceb7",
        "SensitivityLabelId": null,
        "SensitivityLabel": "00000000-0000-0000-0000-000000000000",
        "IsHubSite": false,
        "LockIssue": null,
        "MaxItemsPerThrottledOperation": 5000,
        "MediaTranscriptionDisabled": false,
        "NeedsB2BUpgrade": false,
        "ResourcePath": {
            "__metadata": {
                "type": "SP.ResourcePath"
            },
            "DecodedUrl": "https://{mytenant}.sharepoint.com/sites/test"
        },
        "PrimaryUri": "https://{mytenant}.sharepoint.com/sites/test",
        "ReadOnly": false,
        "RequiredDesignerVersion": "15.0.0.0",
        "SandboxedCodeActivationCapability": 2,
        "ServerRelativeUrl": "/sites/test",
        "ShareByEmailEnabled": false,
        "ShareByLinkEnabled": false,
        "ShowUrlStructure": false,
        "TrimAuditLog": true,
        "UIVersionConfigurationEnabled": false,
        "UpgradeReminderDate": "1899-12-30T00:00:00",
        "UpgradeScheduled": false,
        "UpgradeScheduledDate": "1753-01-01T00:00:00",
        "Upgrading": false,
        "Url": "https://{mytenant}.sharepoint.com/sites/test",
        "WriteLocked": false
    }
}

sUsing the same approach you may call another Rest API end points directly from browser console. It may save your time during troubleshooting. Hope this information will help someone.

Friday, August 12, 2022

Move C:/Users/{username}/AppData folder to D drive

This article may be useful for those PC owners who has small SSD C drive and needs additional space there without uninstalling apps. Some time ago I wrote an article how to free space on C drive using junction folder links: How to free space on OS Windows drive by moving SoftwareDistribution folder to another disk via junction folder.

Here we will use the same idea but for C:/Users/{username}/AppData folder. In my case WinDirStat showed that most of space is occupied in this folder for my basic user. Moving files from there to D drive included several steps:

1. Create new admin user account and login with this account

2. Go to C:/Users/{username}/AppData for your basic user and rename folder to C:/Users/{username}/AppData.old. If Windows will complain that folder is in use try to use Resource Monitor > CPU > Associated handles tab and search by folder name. It will show all processes which currently use this folder. After that you may kill these processes in Task Manager > Details tab: there is User name column so you may choose those apps which work for your basic user account (and which use files from C:/Users/{username}/AppData).

3. Create new folder on D drive, e.g. D:/UserNameAppData

4. Create junction link using the following command in cmd:

mklink /j C:\Users\{username}\AppData D:\UserNameAppData

5. Move all files from C:/Users/{username}/AppData.old to D:\UserNameAppData

6. Restart PC and login with your basic account

In my case after that Windows start icon stopped working. I tried many instructions to restore it but only the following actually helped: The tale of how I managed to solve a nasty start menu corruption. Will duplicate it here in case this link won't be available:

taskkill /F /IM explorer.exe
taskkill /F /IM SearchApp.exe
taskkill /F /IM SearchUI.exe
taskkill /F /IM ShellExperienceHost.exe
taskkill /F /IM StartMenuExperiencehost.exe
Start-Sleep 2

Set-Location $env:LOCALAPPDATA\Packages\Microsoft.Windows.ShellExperienceHost_cw5n1h2txyewy
Remove-Item -Recurse -Force .\TempState\

Set-Location $env:LOCALAPPDATA\Packages\Microsoft.Windows.StartMenuExperiencehost_cw5n1h2txyewy
Remove-Item -Recurse -Force .\TempState\

Add-AppxPackage -Register "C:\Windows\SystemApps\ShellExperienceHost_cw5n1h2txyewy\AppxManifest.xml" -DisableDevelopmentMode
Add-AppxPackage -Register "C:\Windows\SystemApps\Microsoft.Windows.StartMenuExperienceHost_cw5n1h2txyewy\AppxManifest.xml" -DisableDevelopmentMode

Start-Process explorer.exe

After that Windows start icon started to work but search in start menu still didn't work. For restoring search in Windows start menu I used another PowerShell command which I found here:

Get-AppXPackage -AllUsers | Foreach {Add-AppxPackage -DisableDevelopmentMode -Register "$($_.InstallLocation)\AppXManifest.xml"}

After that search also started to work. Note that if your D drive is not SSD apps may work slower after this change because files will be physically stored on D drive now. Hope that this information will help someone.

Friday, June 17, 2022

Get log of triggered Azure web job via REST API programmatically in PowerShell

Continue series of posts about Azure web jobs with this post how to fetch log of triggered Azure web job programmatically via REST API. Previous articles from the series can be found here:

In order to get log of triggered Azure web job programmatically we need to use the following endpoint:

https://{webAppName}.scm.azurewebsites.net/api/triggeredwebjobs/{webJobName}/history

It returns array of runs - information about last run is stored in first element of array. One of the properties there is output_url which contains url of the log of this run. Having this information we may write the following PowerShell function which will fetch log of Azure web job run:

function Get-Web-Job-Most-Recent-Log {
    param (
        $webAppName,
        $webJobName
    )
	$token = Get-AzAccessToken
	$headers = @{ "Authorization" = "Bearer $($token.Token)" }
	$userAgent = "powershell/1.0"
	$history = Invoke-RestMethod -Uri "https://$($webAppName).scm.azurewebsites.net/api/triggeredwebjobs/$($webJobName)/history" -Headers $headers -UserAgent $userAgent -Method GET
	if ($history -eq $null -or $history.runs -eq $null -or $history.runs.Length -eq 0) {
		return $null
	}
	$log = Invoke-RestMethod -Uri $history.runs[0].output_url -Headers $headers -UserAgent $userAgent -Method GET
	return $log
}

With this method we may fetch log of Azure web job programmatically.

Tuesday, June 14, 2022

Trigger web job via web jobs REST API

In my previous post I showed how to get status of triggered Azure web job via web jobs REST API in PowerShell (see Get status of timer triggered Azure web job via REST API in PowerShell). In this post I will show how to trigger web job programmatically also via REST API.

For triggering web job via REST API we need to send HTTP POST request to the following endpoint:

https://{webAppName}.scm.azurewebsites.net/api/triggeredwebjobs/{webJobName}/run

PowerShell method which triggers web job looks like that:

function Run-Web-Job {
    param (
        $webAppName,
	$webJobName
    )
	$token = Get-AzAccessToken
	$headers = @{ "Authorization" = "Bearer $($token.Token)" }
	$userAgent = "powershell/1.0"
	Invoke-RestMethod -Uri "https://$($webAppName).scm.azurewebsites.net/api/triggeredwebjobs/$($webJobName)/run" -Headers $headers -UserAgent $userAgent -Method POST
}

Here we first get access token via Get-AzAccessToken cmdlet and sent POST request with received bearer token. As result it will trigger specified web job to run now.

Friday, June 10, 2022

Get status of timer triggered Azure web job via REST API in PowerShell

In order to get current status of timer triggered Azure web job we may use the following web jobs REST API endpoint:

https://{webAppName}.scm.azurewebsites.net/api/triggeredwebjobs/{webJobName}/history

It will return object with "runs" property which is array containing information about recent runs:

id         : 202206101445293407
name       : 202206101445293407
status     : Running
start_time : 2022-06-10T14:45:29.3564164Z
end_time   : 0001-01-01T00:00:00
duration   : 00:00:04.0337019
output_url : https://{webAppName}.scm.azurewe.scm.azurewebsites.net/vfs/data/jobs/triggered/{webJobName}/202206101445293407/output_log.txt
error_url  :
url        : https://{webAppName}.scm.azurewe.scm.azurewebsites.net/api/triggeredwebjobs/{webJobName}/history/202206101445293407
job_name   : test
trigger    : External -

First element of this array corresponds to the most recent run. If web job is currently running status property will be set to Running. Here is function which we can use for fetching web job status in PowerShell:

function Get-Web-Job-Status {
    param (
    	$webAppName,
	$webJobName
    )
	$token = Get-AzAccessToken
	$headers = @{ "Authorization" = "Bearer $($token.Token)" }
	$userAgent = "powershell/1.0"
	$history = Invoke-RestMethod -Uri "https://$($webAppName).scm.azurewebsites.net/api/triggeredwebjobs/$($webJobName)/history" -Headers $headers -UserAgent $userAgent -Method GET
	if ($history -eq $null -or $history.runs -eq $null -or $history.runs.Length -eq 0) {
		return $null
	}
	return $history.runs[0].status
}

It makes HTTP GET request to mentioned endpoint and gets list of runs for specified web job.

Wednesday, June 8, 2022

Change url of Sharepoint Online list or document library via PnP.PowerShell

In order to change url of Sharepoint Online list or document library you may use the following PnP.PowerShell script:

Connect-PnPOnline -Url https://{tenant}.sharepoint.com/sites/foo
$list = Get-PnPList MyList
$list.RootFolder.MoveTo("MyListNewUrl")
$ctx = Get-PnPContext
$ctx.ExecuteQuery()

In this example we change list url to MyListNewUrl.

Wednesday, June 1, 2022

One solution for solving VM starting error in VMware Player

If you use VMware Workstation Player you may face with the following error when try to resume/start VM:

Error while powering on: Virtualized performance counters require at least one available functioning counter.
Module 'VPMC' power on failed.
Failed to start the virtual machine.


If you faced with this error try to do the following: go to VM settings > Processors and uncheck "Virtualize CPU performance counters" checkbox:

After that try to run VM again. It should start this time.

Thursday, May 12, 2022

Query items from CosmosDB based on presense or absense of complex object property

In my previous article I showed how to query items from CosmosDB using conditions against nested properties: see Query nested data in CosmosDB. In this post I will show how to query items based on presence or absence of complex object property. Let's use the same example which was used in mentioned post:

[{
    "id": "1",
    "title": "Foo",
    "metadata": {
        "metadataId": "123",
        "fieldValues": [
            {
                "fieldName": "field1",
                "values": [
                    "val1"
                ]
            },
            {
                "fieldName": "field2",
                "values": [
                    "val2"
                ]
            },
            {
                "fieldName": "field3",
                "values": [
                    "val2"
                ]
            }
        ]
    }
},
{
    "id": "2",
    "title": "Bar",
},
...
]

So we have 2 objects Foo and Bar. Foo object has metadata property while Bar doesn't. How to fetch all objects which have metadata property? And vice versa: how to fetch those objects which don't have it?

The first attempt would be to compare it with null:

SELECT * FROM c WHERE c.metadata != null

And it works. However if we will try to use the same technique for fetching all items which don't have metadata the following query won't return any results:

SELECT * FROM c WHERE c.metadata = null

Better option which works in both cases will be to use helper function IS_DEFINED. With this function in order to fetch all items which have metadata property we may use the following query:

SELECT * FROM c WHERE IS_DEFINED(c.metadata)

And similarly we may fetch objects which don't have metadata:

SELECT * FROM c WHERE NOT IS_DEFINED(c.dynamicMetadata)

This technique is more universal since it works in both scenarios.

Monday, May 9, 2022

Query nested data in CosmosDB

Let's say we have objects in CosmosDB with complex nested structure:

[{
	"id": "1",
	"title": "Foo",
	"metadata": {
		"metadataId": "123",
		"fieldValues": [
			{
				"fieldName": "field1",
				"values": [
					"val1"
				]
			},
			{
				"fieldName": "field2",
				"values": [
					"val2"
				]
			},
			{
				"fieldName": "field3",
				"values": [
					"val2"
				]
			}
		]
	}
},
...
]

And we need to fetch items items by metadata values stored in field1, field2, etc. Using above example if we need to fetch objects which have metadata.metadataId = "123", field1.value = "val1" and field2.value = "val2" we should use the following query:

SELECT * FROM c
WHERE c.metadata.metadataId = '123' AND
EXISTS(SELECT VALUE fv.fieldName FROM fv IN c.dynamicMetadata.fieldValues WHERE fv.fieldName = 'field1' AND
    EXISTS(SELECT VALUE v FROM v IN fv.values WHERE v = 'val1'))
AND
EXISTS(SELECT VALUE fv.fieldName FROM fv IN c.dynamicMetadata.fieldValues WHERE fv.fieldName = 'field2' AND
        EXISTS(SELECT VALUE v FROM v IN fv.values WHERE v = 'val2'))

If values for some field contain multiple values we may construct even more complex conditions by combining conditions for single field values by AND or OR operators depending on requirements.

Friday, May 6, 2022

Export Sharepoint Online lists with their content to PnP template via PnP PowerShell

As you probably know it is possible to export Sharepoint Online sites to PnP template using Get-PnPSiteTemplate cmdlet. By default it will export only structure but it is also possible to export Sharepoint lists with content (list items) to PnP template. This is quite commonly needed request in many maintenance tasks. Of course you may save list as template with content from UI but if you need to automate it this option is not very convenient.

If you need to export Sharepoint list with its content to PnP template use the following commands:

Connect-PnPOnline -Url https://{mytenant}.sharepoint.com/sites/foo -Interactive
Get-PnPSiteTemplate -Out template.pnp -ListsToExtract "Test" -Handlers Lists
Add-PnPDataRowsToSiteTemplate -Path template.pnp -List "Test"

In this example we export list Test with list items to PnP template template.pnp. Hope that it will help someone.

Tuesday, May 3, 2022

Get functions invocations list for continuous Azure web job via REST API

This post is continuation of series of articles about continuous Azure web jobs. You may find previous articles about continuous web jobs here:

In this post I will show how to get list of functions' invocations for continuous web job via REST API.

As you probably know (and as it was shown in one of above articles) when you work with continuous web job we need to implement function which will be triggered e.g. using Azure queue trigger. Log which is shown in Azure portal looks bit different for continuous web jobs comparing with timer triggered web jobs: every time when this handler function got triggered new invocation is added to the log. It contains details of this particular function's invocation:


In order to get this list of functions' invocations programmatically we may use WebJobs REST API and more specifically the following endpoint:

https://{app-service-name}.scm.azurewebsites.net/azurejobs/api/jobs/continuous/{webJob}/functions?limit={limit}

Response will look like that:

{
    "entries": [{
            "executingJobRunId": null,
            "id": "0399f7d5-a7aa-43c9-8853-70886174fda3",
            "functionId": null,
            "functionName": null,
            "functionFullName": null,
            "functionDisplayTitle": "ProcessQueueMessage (5540, )",
            "status": "CompletedSuccess",
            "whenUtc": "2022-05-03T12:12:05.3054119Z",
            "duration": 101650.2167,
            "exceptionMessage": null,
            "exceptionType": null,
            "hostInstanceId": "00000000-0000-0000-0000-000000000000",
            "instanceQueueName": null
        }, {
            "executingJobRunId": null,
            "id": "d581d6fa-8ba0-4c4d-ad39-c8505d21b851",
            "functionId": null,
            "functionName": null,
            "functionFullName": null,
            "functionDisplayTitle": "ProcessQueueMessage (5539, )",
            "status": "CompletedSuccess",
            "whenUtc": "2022-05-03T12:12:04.4842786Z",
            "duration": 100893.4565,
            "exceptionMessage": null,
            "exceptionType": null,
            "hostInstanceId": "00000000-0000-0000-0000-000000000000",
            "instanceQueueName": null
        }
    ],
    "continuationToken": null,
    "isOldHost": false
}

It contains array of objects which represent invocation details. Id property contains actual invocationId which may be used e.g. for getting invocation log by the following url:

https://{app-service-name}.scm.azurewebsites.net/azurejobs/#/functions/invocations/{invocationId}

Property functionDisplayTitle contains name of invocation together with passed parameter. It may hep if you need to map input parameters with invocation log. Also pay attention on continuationToken - if there are many invocations (more than passed in limit query string parameter) it will contain continuation token using which you may get whole list of invocations by pages.

Wednesday, April 13, 2022

Resolve “Everyone except external users” group using PnP.PowerShell

In my previous posts I showed several ways to resolve special group in Sharepoint Online "Everyone except external users" which represents all users in organization except external users:

In this post I will show how to do that with PnP.PowerShell. Simplest way which will work on most tenants is the following:

$authRealm = Get-PnPAuthenticationRealm
$everyOneExceptExternals = Get-PnPUser -Id "c:0-.f|rolemanager|spo-grid-all-users/$authRealm"

But on some tenants (e.g. old tenants) it may not work because this special group was created with different naming convention there (see link above). For such tenants we may use the following additional step:

if (!$everyOneExceptExternals) {
	$everyOneExceptExternals = Get-PnPUser | Where-Object { $_.LoginName.StartsWith("c:0-.f|rolemanager|spo-grid-all-users/") }
}

Here we try to find user which login name starts with special "c:0-.f|rolemanager|spo-grid-all-users/" prefix. This prefix is used in login name of "Everyone except external users" group. With this approach you may resolve this special group both on new and old tenants. Hope it will help someone.

Friday, April 8, 2022

Create folders with special characters in Sharepoint Online programmatically via CSOM

If you worked with SP on-prem you probably know that some special characters are not allowed in folders names there. In Sharepoint Online however it is possible to use some special characters in folders names:

How to create such folders with special characters programmatically via CSOM? If we will try to do it using the same approach which we used for SP on-prem it will implicitly remove all parts in folder names which come after special characters i.e. in above example abc, def, ghi:

public static ListItem AddFolder(ClientContext ctx, List list, string parentFolderUrl, string folderName)
{
    var lici = new ListItemCreationInformation
    {
        UnderlyingObjectType = FileSystemObjectType.Folder,
        LeafName = folderName.Trim(),
        FolderUrl = parentFolderUrl
    };

    var folder = list.AddItem(lici);
    folder["Title"] = lici.LeafName;
    folder.Update();
    ctx.ExecuteQueryRetry();

    return folder;
}

If we want to create folders with special characters we need to use another CSOM method Folder.AddSubFolderUsingPath:

public static void AddFolderUsingPath(ClientContext ctx, Folder parentFolder, string folderName)
{
    parentFolder.AddSubFolderUsingPath(ResourcePath.FromDecodedUrl(folderName));
    ctx.ExecuteQueryRetry();
}

With this method folders with special characters will be created successfully in Sharepoint Online.

Thursday, March 24, 2022

How to identify Sharepoint Online sites which belongs to Teams private channels

In MS Teams team owner may create private channels: only members of these channels will have access to these channels. What happens under the hood is that for each private channel Teams creates separate SPO site collection with own permissions. E.g. if we have team with 2 private channels channel1 and channel2:

it will create 2 SPO sites with the following titles:

  • {team name} - channel1
  • {team name} - channel2

If we will visit these sites in browser we will notice that there will be teams icon near site title and "Private channel | Internal" site classification label:


How we may identify such SPO sites which correspond to teams private channels? E.g. if want to fetch all such sites via search.

At first I tried to check web property bag of these sites because this is how we may identify that site belongs to O365 group (see Fetch Sharepoint Online sites associated with O365 groups via Sharepoint Search KQL) but didn't find anything there. The I used Sharepoint Search Query Tool and found that these sites have specific WebTemplate = TEAMCHANNEL:

So in order to identify SPO sites which correspond to teams private channels we may use the following KQL:

WebTemplate:TEAMCHANNEL

It will return all sites for teams private channels.

Friday, March 18, 2022

Several ways to reduce JSON response size from Web API

If you have Web API which returns some data in JSON format at some point you may need to optimize its performance by reducing response size. It doesn't important on which technology Web API is implemented (ASP.Net Web API, .Net Azure Functions or something else). For this article the only important thing is that it is implemented on .Net stack.

Let's assume that we have an endpoint which returns array of objects of the following class which have many public properties:

public class Foo
{
    public string PropA { get; set; }
    public string PropB { get; set; }
    public string PropC { get; set; }
    public string PropD { get; set; }
    ...
}

By default all these properties will be returned from our API (including those properties which contain nulls):

[{
        "PropA": "test1",
        "PropB": null,
        "PropC": null,
        "PropD": null,
        ...
    }, {
        "PropA": "test2",
        "PropB": null,
        "PropC": null,
        "PropD": null,
        ...
    },
    ...
]

As you can see these properties with nulls still add many bytes to the response. If we want to exclude properties which contain nulls from response (which in turn may significantly reduce response size) we may add special class-level and property-level attributes to our class. Note however that it will help only if you serialize response with Json.Net lib (Newtonsoft.Json):

[JsonObject(MemberSerialization.OptIn)]
public class Foo
{
    [JsonProperty(NullValueHandling = NullValueHandling.Ignore)]
    public string PropA { get; set; }
    [JsonProperty(NullValueHandling = NullValueHandling.Ignore)]
    public string PropB { get; set; }
    [JsonProperty(NullValueHandling = NullValueHandling.Ignore)]
    public string PropC { get; set; }
    [JsonProperty(NullValueHandling = NullValueHandling.Ignore)]
    public string PropD { get; set; }
}

Attribute JsonObject(MemberSerialization.OptIn) means that it should serialize only those properties which are explicitly decorated by JsonProperty attribute. After that response will look like that:

[{
        "PropA": "test1",
    }, {
        "PropA": "test2",
    },
	...
]

i.e. it will only contain those properties which have not-null value.

As you can see response size got significantly reduced. The drawback of this approach is that it will work only with Json.Net lib (JsonObject and JsonProperty attributes classes are defined in Newtonsoft.Json assembly). If we don't use Newtonsoft.Json we need to use another approach which is based on .Net reflection and on the fact that Dictionary is serialized to JSON in the same way as object with the properties. Here is the code which does it:

// get array of items of Foo class
var items = ...;

// map function for removing null values
var propertiesMembers = new List<PropertyInfo>(typeof(Foo).GetProperties(BindingFlags.Instance | BindingFlags.Public));
Func<Foo, Dictionary<string, object>> map = (item) =>
{
    if (item == null)
    {
        return new Dictionary<string, object>();
    }
    var dict = new Dictionary<string, object>();
    foreach (string prop in selectProperties)
    {
        if (string.IsNullOrEmpty(prop) || !propertiesMembers.Any(p => p.Name == prop))
        {
            continue;
        }
		
        var val = item.GetPublicInstancePropertyValue(prop);
        if (val == null)
        {
            // skip properties with null
            continue;
        }
        dict.Add(prop, val);
    }
    return dict;
};

// convert original array to array of Dictionary objects each of which contains only not null properties
return JsonConvert.SerializeObject(items.Select(i => map(i)));

At first we get original array of items of Foo class. Then we define map function which creates Dictionary from Foo object and this dictionary contains only those properties which don't contain null value (it is done via reflection). Here I used helper method GetPublicInstancePropertyValue from PnP.Framework but it is quite easy to implement by yourself also:

public static Object GetPublicInstancePropertyValue(this object source, string propertyName)
{
    return (source?.GetType()?.GetProperty(propertyName,
            System.Reflection.BindingFlags.Instance |
            System.Reflection.BindingFlags.Public |
            System.Reflection.BindingFlags.IgnoreCase)?
        .GetValue(source));
}

With this approach we will also get reduced response which will contain only not-null properties and it will work also without Newtonsoft.Json:

[{
        "PropA": "test1",
    }, {
        "PropA": "test2",
    },
	...
]


Tuesday, March 15, 2022

Handle errors when load images on a web page

Regular html images (<img> tag) have quite powerfull mechanism of error handling and practice shows that it is not that well-known. E.g. if we have image on some web page (it may be any html web page regardless of underlying technology which rendered it) defined like that:

<img src="http://example.com/image.png" />

Now suppose that browser couldn't fetch this image because of some reason: e.g. image could not be found in specified url location (404 Not Found) or current user doesn't have permissions to this location (403 Forbidden). How to handle such situations and add graceful fallback logic (e.g. show some predefined image placeholder or use more advanced technique to fetch the image)?

There is standard html mechanism which allows to handle errors which may occur during loading of the images. Within img tag we may define error handler like that:

<img src="http://example.com/image.png" onerror="imageOnError()" />

In this case imageOnError() function will be called when error will occur during loading of the image. Knowing this technique we may implement graceful fallback for some scenarios when initial image was not successfully loaded because of some reason. E.g. some time ago I wrote an article where showed how to fetch image from Sharepoint site collection where current user doesn't have access: Return image stored in Sharepoint Online doclib from Azure function and show it in SPFx web part. If we will combine these 2 posts we may implement logic which by default shows images from predefined location (e.g. from Sharepoint doclib). But if current user doesn't have access to this doclib we may use onerror handler and fetch image via Azure function and app permissions and then show it in base64 encoded format. This is only one example how described technique may help to achieve more user friendly experience and provide functionality for end users which otherwise wouldn't be available.

Thursday, March 10, 2022

Disable PnP telemetry

PnP components send telemetry data to PnP team which helps to get more statistics for making various technical and architectural decisions. However sometimes you may want to disable it for the customer (e.g. due to GDPR or related topics). In this case you need to disable telemetry in the following components:

  • PnP.PowerShell
  • PnP.Framework
  • PnP.Core
  • pnp js

For disabling telemetry in PnP.PowerShell run the following command:

$env:PNPPOWERSHELL_DISABLETELEMETRY = $true

Note that it will disable PnP.PowerShell telemetry only in the current PowerShell session.

PnP.Framework itself doesn't send telemetry but it uses PnP.Core in some scenarios (e.g. modern pages API) which in turn sends telemetry. I.e. if you use PnP.Framework (and not create PnP.Core context by yourself) there is currently no option to disable it. However PnP team is working over it and probably soon there will be update about it. For disabling telemetry in PnP.Core you need to set property DisableTelemetry to false during creation of the context e.g. like this:

public class Startup : FunctionsStartup
{
    public override void Configure(IFunctionsHostBuilder builder)
    {
        var config = builder.GetContext().Configuration;
        var settings = new Settings();
        config.Bind(settings);
        builder.Services.AddPnPCore(options =>
        {
            options.DisableTelemetry = true;
            ...
        });
    }
}

For disabling telemetry in pnp js use the following code:

import PnPTelemetry from "@pnp/telemetry-js";

const telemetry = PnPTelemetry.getInstance();
telemetry.optOut();

Tuesday, March 1, 2022

Return image stored in Sharepoint Online doclib from Azure function and show it in SPFx web part

Imagine that we need to display image which is stored e.g. in Style library doclib of Sharepoint Online site collection (SiteA) on another site collection (SiteB) and that users from SiteB may not have permissions on SiteA. One solution is to return this image in binary form from Azure function (which in turn will read it via CSOM and app permissions) and display in SPFx web part in base64 format. With this approach way we can avoid SPO permissions limitation (assuming that Azure functions are secured via AAD: Call Azure AD secured Azure functions from C#).

At first we need to implement http-triggered Azure function (C#) which will return requested image (we will send image url in query string param). It may look like this (for simplicity I removed errors handling):

[FunctionName("GetImage")]
public static async Task<HttpResponseMessage> Run([HttpTrigger(AuthorizationLevel.Anonymous, "get", Route = null)]HttpRequestMessage req, TraceWriter log)
{
	string url = req.GetQueryNameValuePairs().FirstOrDefault(q => string.Compare(q.Key, "url", true) == 0).Value;
	var bytes = ImageHelper.GetImage(url);
	
	var content = new StreamContent(new MemoryStream(bytes));
	content.Headers.ContentType = new MediaTypeHeaderValue(ImageHelper.GetMediaTypeByFileUrl(url));

	return new HttpResponseMessage(HttpStatusCode.OK)
	{
		Content = content
	};
}

Here 2 helper functions are used: one which gets actual image as bytes array and another which returns media type based on file extension:

public static class ImageHelper
{
	public static byte[] GetImage(string url)
	{
		using (var ctx = ...) // get ClientContext
		{
			var web = ctx.Web;
			var file = web.GetFileByServerRelativeUrl(new Uri(url).AbsolutePath);
			ctx.Load(file);
			
			var fileStream = file.OpenBinaryStream();
			ctx.ExecuteQuery();
			
			byte[] bytes = new byte[fileStream.Value.Length];
			fileStream.Value.Read(bytes, 0, (int)fileStream.Value.Length);
			return bytes;
		}
	}

	public static string GetMediaTypeByFileUrl(string url)
	{
		string ext = url.Substring(url.LastIndexOf(".") + 1);
		switch (ext.ToLower())
		{
			case "jpg":
				return "image/jpeg";
			case "png":
				return "image/png";
			... // enum all supported media types here
			default:
				return string.Empty;
		}
	}
}

Now we can call this AF from SPFx:

return await this.httpClient.get(url, SPHttpClient.configurations.v1,
	{
		headers: ..., // add necessary headers to request
		method: "get"
	}
).then(async (result: SPHttpClientResponse) => {
	if (result.ok) {
		let binaryResult = await result.arrayBuffer();
		return new Promise((resolve) => {
			resolve({ data: binaryResult, type: result.headers.get("Content-Type") });
	});
})

And the last step is to encode it to base64 and add to img src attribute:

let img = ...; // get image element from DOM
let result = await getImage(url);
img.setAttribute("src", `data:${result.type};base64,${Buffer.from(result.data, "binary").toString("base64")}`)

After that image from SiteA will be shown on SiteB even if users don't have access to SiteA directly.

Wednesday, February 23, 2022

How to enable DevTools for Microsoft Teams desktop client

If you develop apps for MS Teams (here we will use SPFx app running inside Teams) at some point you will most probably face with the need of debugging it in Teams desktop client. Of course in some scenarios you may use web client https://teams.microsoft.com/ and use regular browser developer tools (F12) for debugging however it is not always possible because some bugs may be reproduced only in desktop client. In this case you will need to find a way to debug them in desktop client.

The most simple approach is to use good old window.alert() across the code. Without browser console accessible in desktop client it will help to understand what happens in the code execution flow. But if you had experience with that (i.e. if you are old enough when everybody used it for debugging :) ) you probably know that this is quite boring and time consuming approach.

More powerful way to debug apps in Teams desktop client is to use DevTools for Microsoft Teams. For enabling it we first need to switch Teams client to Developer preview mode. It can be done from 3 dots in the top right corner > About menu:

After that you will get nice looking "P" (preview) icon added to your logo in top right corner of the window :) Also you will be able to open DevTools window by right click on MS Teams icon in System tray:

It will open DevTools table similar to those used in browsers (with console tab, network tab, etc):

which will greatly simplify debugging of the apps in Teams desktop client.

Wednesday, February 16, 2022

Disadvantages of Azure table storage as NoSQL data storage

We used Azure table storage as NoSQL data storage for quite a time and got some experience which may be useful to share with community. First of all I want to say that I like Azure table storage: it is very simple to use (there are different SDKs), flexible with it's dynamic data schema for tables (although this must be a common thing in NoSQL world), fast (if you use it correctly and avoid full table scan scenarios) and last but not least - it is very cheap.

However at the same time it has number of cons which may be significant depending on amount of data you need to process and performance which you need to achieve. I collected them in the following table:

Cons Comments
No LIKE operator Can't perform search by sub string. Need to introduce complex data duplication patterns with different PartitionKey/RowKey for avoiding full table scan and performance issues
Only 2 system indexed columns (PartitionKey/RowKey) without possibility to add own indexes Can't add custom indexed fields for improving queries performance
No full pagination support on API level There is possibility to limit returned resultset size, but no possibility to skip number of rows
No native backup options There are 3rd party (including open source) solutions which can be used but no built-in support from MS

Like I said I personally like Azure table storage. But due to these cons you may also consider other options for data storage e.g. Azure CosmosDB which is more expensive but also more powerful at the same time.

Wednesday, February 9, 2022

Problem with SPO app bar and Teams custom app with static tabs

If you use staticTabs in your custom MS Teams app (see Manifest schema for Microsoft Teams):

{
  "$schema": "https://developer.microsoft.com/en-us/json-schemas/teams/v1.5/MicrosoftTeams.schema.json",
  "manifestVersion": "1.5",
  ...
  "staticTabs": [
    {
      "entityId": "Foo",
      "name": "Bar",
      "contentUrl": "...",
      "websiteUrl": "https://example.com",
      "scopes": [
        "personal"
      ]
    }
  ],
  ...
}

you may face with the following issue: when user clicks on app icon it correctly opens web page defined in staticsTabs. But if user clicks on that second time after web page has been loaded then SPO app bar callout will be shown with My sites/My news.

In order to fix it the following workaround can be used: identify that app on opened web page is running inside Teams (this article contains details how to do that: How to identify whether SPFx web part is running in web browser or in Teams client) and hide SPO app bar callouts via css in this case. This is how it can be done via TypeScript (for this example we assume that app is SPFx web part running on SPO page):

if (isAppRunningInsideTeams()) {
  const style = document.createElement("style");
  style.textContent = "#sp-appBar-callout { display:none !important; } ";
  const head = document.getElementsByTagName("head")[0];
  head.appendChild(style);
}

It will hide callouts only inside Teams where this problem happens and at the same time it will still work in SPO.

Monday, January 31, 2022

How to get all items from large lists in Sharepoint Online

As you probably know Sharepoint lists have default throttling limit 5000 items which means that if query result to more than 5000 items it will throw resource throttling exception. One solution which you may try is to use RowLimit:

<View>
    <Query>
        <Where>
            <Eq>
                <FieldRef Name=\"Title\" />
                <Value Type=\"Text\">test</Value>
            </Eq>
        </Where>
    </Query>
    <RowLimit>5000</RowLimit>
</View>

Or with Camlex:

var camlQuery = Camlex.Query()
    .Where(x => (string)x["Title"] == "test")
    .Take(5000)
    .ToCamlQuery();

However if list contains more than 5000 items this query will anyway result in resource throttling exception regardless of RowLimit being set. Another possible solution is to try to add index to set some field as indexed and use condition against this field in query. But what if you can't do that (e.g. if you don't have control over the list schema)? How to get all items from large list then?

For that you may use query ID > 0 (which is always true since ID is auto generated integer) and CamlQuery.ListItemCollectionPosition property which allows to get paginated results. Code will look like this:

ListItemCollectionPosition position = null;
var items = new List<ListItem>();
do
{
    var camlQuery = Camlex.Query()
        .Where(x => (int)x["ID"] > 0)
        .ViewFields(x => new []
        {
            x["ID"],
            x["Title"]
        })
        .Take(5000)
        .ToCamlQuery();
    camlQuery.ListItemCollectionPosition = position;
    var listItems = list.GetItems(camlQuery);
    ctx.Load(listItems);
    ctx.ExecuteQueryRetry();

    items.AddRange(listItems);
    position = listItems.ListItemCollectionPosition;

    if (position == null)
    {
        break;
    }
} while (true);

It will fetch items by 5000 items per page until all items from large list will be fetched.

Thursday, January 27, 2022

Delete O365 group with associated site collection via Graph SDK

In order to delete O365 group (Azure AD group + Sharepoint Online site collection) via .Net Graph SDK the following code may be used:

public static bool DeleteGroup(string groupId)
{
    try
    {
        if (string.IsNullOrEmpty(groupId))
        {
            return false;
        }

        var graphClientApp = new GraphServiceClient(new AzureAuthenticationProviderAppPermissions());
        if (graphClientApp == null)
        {
            return false;
        }

        graphClientApp.Groups[groupId].Request().DeleteAsync().GetAwaiter().GetResult();

        return true;
    }
    catch (Exception x)
    {
        return false;
    }
}

public class AzureAuthenticationProviderAppPermissions : IAuthenticationProvider
{
    // implement own authentication logic for app permissions
}

Azure AD group will be deleted immediately while associated site collection will be deleted with some delay (usually few minutes).

Friday, January 21, 2022

CosmosDB: compare queries performance against strings and array properties

Imagine that we have CosmosDB instance running in Azure (created with SQL syntax enabled) which has groups entities. Each group has members property - JSON array of members of this group. Also each group has the same members serialized to string in membersStr property:

{
    "id": "cf66e4ea-39b6-43bf-a237-8ae997c8cd6a",
    "membersStr": "[{\"loginName\":\"user.automatic17@mytenant.onmicrosoft.com\",\"displayName\":\"User Automatic17\",\"id\":\"53bcf941-fa64-4af2-ac47-c7f48430df29\"},{\"loginName\":\"user.automatic52@mytenant.onmicrosoft.com\",\"displayName\":\"User Automatic52\",\"msGraphUserId\":\"515ee5ae-71dc-4c5a-a844-41af5f9d419c\"},{\"loginName\":\"user.automatic67@mytenant.onmicrosoft.com\",\"displayName\":\"User Automatic67\",\"msGraphUserId\":\"21106ae1-25fb-43ac-a5e5-aa1f0d3f9f2f\"}]",
    "members": [{
        "loginName": "user.automatic17@mytenant.onmicrosoft.com",
        "displayName": "User Automatic17",
        "id": "53bcf941-fa64-4af2-ac47-c7f48430df29"
    }, {
        "loginName": "user.automatic52@mytenant.onmicrosoft.com",
        "displayName": "User Automatic52",
        "msGraphUserId": "515ee5ae-71dc-4c5a-a844-41af5f9d419c"
    }, {
        "loginName": "user.automatic67@mytenant.onmicrosoft.com",
        "displayName": "User Automatic67",
        "msGraphUserId": "21106ae1-25fb-43ac-a5e5-aa1f0d3f9f2f"
    }]
	...
}

The question which we wanted to clarify is if we want to get groups where specific user is member - what query will be faster:

1. which uses membersStr property and LIKE operator:

SELECT c FROM c WHERE c.membersStr LIKE '%{userId}%'

2. or which uses array and object-oriented query against members properties:

SELECT c FROM c JOIN m IN c.members WHERE m.id = '{userId}'

For running this test I used CosmosDB with 10K entities with random users data. For testing I used the following C# methods:

private static List<object> GetGroupsByArray(string userId)
{
    string query = $"SELECT c FROM c JOIN m IN c.members WHERE m.id = '{userId}'";
    QueryDefinition queryDefinition = new QueryDefinition(query);
    var groupsContainer = cosmosClient.GetContainer(DBName, ContainerName);
    FeedIterator<object> queryResultSetIterator = groupsContainer.GetItemQueryIterator<object>(queryDefinition);
    var groups = new List<object>();
    while (queryResultSetIterator.HasMoreResults)
    {
        FeedResponse<object> currentResultSet = queryResultSetIterator.ReadNextAsync().GetAwaiter().GetResult();
        foreach (var group in currentResultSet)
        {
            groups.Add(group);
        }
    }

    return groups;
}

private static List<object> GetGroupsByString(string userId)
{
    string query = $"SELECT c FROM c WHERE c.membersStr LIKE '%{userId}%'";
    QueryDefinition queryDefinition = new QueryDefinition(query);
    var groupsContainer = cosmosClient.GetContainer(DBName, ContainerName);
    FeedIterator<object> queryResultSetIterator = groupsContainer.GetItemQueryIterator<object>(queryDefinition);
    var groups = new List<object>();
    while (queryResultSetIterator.HasMoreResults)
    {
        FeedResponse<object> currentResultSet = queryResultSetIterator.ReadNextAsync().GetAwaiter().GetResult();
        foreach (var group in currentResultSet)
        {
            groups.Add(group);
        }
    }

    return groups;
}

Each method was called with 10 random user ids. In both cases time of query depended from number of groups user belongs to (the more groups user was member of the more time query took). I made 10 test runs of both methods and measured execution time with System.Diagnostics.Stopwatch. Then I calculated average execution time for each run of 1st method and separately for 2nd method. Finally I measured average execution time for all 10 test runs.

Result was that query against string property (JSON-serialized array) was a bit faster (929.53 milliseconds) than query agianst array property (1362.3). Conclusion is that if performance is not critical for you and you want to have nice-looking entities in CosmosDB you may use array properties. But if performance is critical you may consider to use JSON-serialized property (or use both as an option).

Update 2022-04-14: we also compared internal query engine execution time and got different results. For array-based approach performance was better. For string-based approach query took 38ms:

while for array-based approach only 18ms:

Probably .Net SDK which was used during 1st test added own delays. Consider that when you will choose approach for your scenario.

Friday, January 14, 2022

How to get Azure storage account associated with Azure function app via PowerShell

As you probably know Azure function app is provisioned with Storage account behind it which is used for internal needs of function app (e.g. storing compiled dlls of Azure functions in blob storage of this storage account or storing App insights logs in tables). If we need to get instance of this storage account associated with Azure function app we may use the following PowerShell:

$app = Get-AzWebApp -Name "MyFunctionApp" -ResourceGroupName "MyResourceGroup"
$kv = $app.SiteConfig.AppSettings | Where-Object { $_.Name -eq "AzureWebJobsDashboard" }
$found = $kv.Value -match ".*;AccountName=(.+?);"
$storageAccountName = $matches[1]
$storageAccount = Get-AzStorageAccount -StorageAccountName $storageAccountName -ResourceGroupName "MyResourceGroup"

In above code we first get instance of function app using Get-AzWebApp cmdlet and find AzureWebJobsDashboard application setting which contains connection string of associated storage account. After that we retrieve storage account name from connection string using regex and finally call Get-AzStorageAccount to get actual storage account instance. Hope it will help someone.